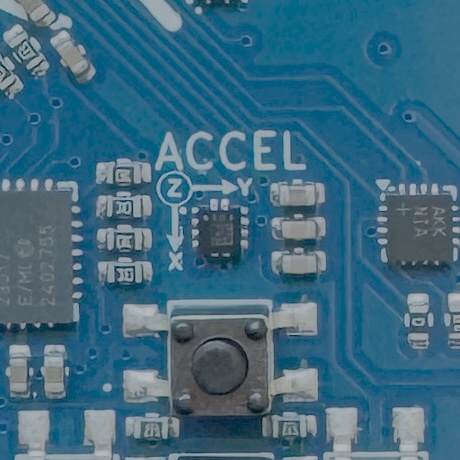
Accelerometer on the Y-Board
There is an accelerometer on the Y-Board. This sensor is used to measure the acceleration of the board in three dimensions: x, y, and z. The accelerometer can be used to detect the orientation of the board, detect movement, and more. The sensor returns values in milli-g’s, which is a unit of acceleration. 1 g is equal to 9.8 m/s2.

Functions
The function to read the acceleration of the board is:
Yboard.get_accelerometer();
This function returns a accelerometer_data struct that contains the acceleration in the x, y, and z direction. The temperature is in degrees Celsius and the humidity is a percentage. A C struct is a way to group related variables together. Here is the definition of the accelerometer_data struct:
struct accelerometer_data {
    float x;
    float y;
    float z;
};
To access the x, y, and z values, you can use the . operator:
accelerometer_data data = Yboard.get_accelerometer();
float x = data.x;
float y = data.y;
float z = data.z;
The accelerometer is not always ready to return values. You can check if the accelerometer is ready by calling:
Yboard.accelerometer_available();
If the accelerometer is not ready, it will return false. If the accelerometer is ready, it will return true. You can use this function to make sure you only read the accelerometer values when they are available.
X, Y, and Z Values
Accelerometers measure acceleration in three dimensions: x, y, and z. The x-axis is horizontal and points to the right, the y-axis is vertical and points up, and the z-axis is perpendicular to the board and points out of the board. Depending on the direction of the acceleration, the values of x, y, and z will change. Values can be positive or negative depending on the direction of the acceleration.
Examples
Here is an example of using the accelerometer to control some LEDs. If the acceleration in the x direction is positive, the first LED will turn red, otherwise it will turn blue. The same is done for the y and z directions.
while(true) {
    if(Yboard.accelerometer_available()) {
        accelerometer_data data = Yboard.get_accelerometer();

        if(data.x > 0) {
            Yboard.set_led_color(1, 255, 0, 0);
        } else {
            Yboard.set_led_color(1, 0, 0, 255);
        }

        if(data.y > 0) {
            Yboard.set_led_color(2, 255, 0, 0);
        } else {
            Yboard.set_led_color(2, 0, 0, 255);
        }

        if(data.z > 0) {
            Yboard.set_led_color(3, 255, 0, 0);
        } else {
            Yboard.set_led_color(3, 0, 0, 255);
        }
    }
}
Exploration
Remember to change main.cpp before continuing…
📝 NOTE: You will need to go to
main.cppand change the comments to call the correct activity function.
-
Print the x, y, and z values to the serial monitor. What is the biggest value you see in each direction? What is the smallest value you see in each direction? What happens when you move the board around?
-
Copy the example code. Move the board around and see if you can make the LEDs change color. What happens when you move the board in the x direction? What happens when you move the board in the y direction? What happens when you move the board in the z direction?
Challenges
Remember to comment out the accelerometer_exploration(); call in the accelerometer_activity function and uncomment the correct challenge function:
// accelerometer_exploration();
accelerometer_challenge1();
Challenge 1: Turn on the LEDs on each side of the board when the board is tilted in that direction. For example, if the board is tilted to the right, turn on the LEDs on the right side of the board. If the board is tilted to the left, turn on the LEDs on the left side of the board. If the board is tilted up, turn on the top LEDs. If the board is tilted down, turn on the bottom LEDs.